A week or so ago, John O’Nolan tweeted a link to a Photoshop redesign of Twitter, making it look less cluttered. Like a bit of a nerd, I turned it into a Greasemonkey script.
Really it was just a bit of fun. Once I start thinking about how to do something, I may as well just go and do it. So it was just a once off – I won’t be updating the script in future, etc.
Note: Having said that, for the 4 users who downloaded the first version, there is a new version which deals with the race condition properly, so that it will work every time and without an artificial delay. Get it from Userscripts.org.
Anyway, I thought it was worth writing up for it’s educational value.
The Screenshots
You won’t know what I’m talking about without before and after shots. Luckily you can’t see my full Twitter background, as it needs some serious work.
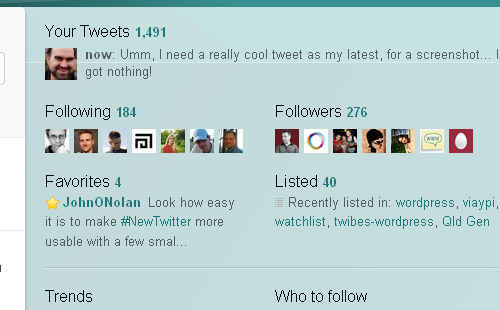
Twitter Before:
Twitter After:
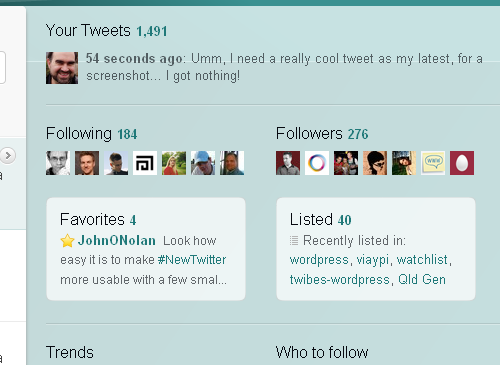
As you can see, nothing major, but it does look nicer.
The Source Code
I won’t go into how to write a Greasemonkey script. There are plenty of existing articles out there. However, if you want to see the full source code, it’s available on Userscripts.org.
Embedding jQuery
Yes that’s right, I’ve embedded jQuery in the Greasemonkey script. In this case it’s version 1.3.1 because that’s what I had to hand (and version 1.4.2 didn’t seem to work for some reason).
I’ve used this approach in quite a few of my Greasemonkey script. Why? Because it’s so much quicker than writing proper JavaScript (which takes me so much longer these days).
I’m sure many people question this, but I’ll stand by it: JQuery’s not being downloaded, which would take time and bandwidth. It’s embedded in a script that’s stored locally by the browser. Greasemonkey uses namespaces, so there’s no chance of conflicts with jQuery already running on the page.
What are the negatives of embedding jQuery in a Greasemonkey script? None that I know of! But please let me know via the comments if you know of any.
Note, for those who question this approach, I’ve heard Remy Sharp say (on a podcast) that he believes that in future, common JavaScript libraries such as jQuery will be embedded in the browser rather than being downloaded.
The Code That Matters
If you scroll down to the very bottom of the source code, you’ll find the code I wrote to implement the changes. Let me break it down.
Embedded Base64 Background Image
The first block of code is as follows:
[sourcecode language=”javascript”]GM_addStyle(".thejohnonolan {height:104px !important; width:172px !important;padding:10px 14px !important; background:url(data:image/png;base64,iVBORw0KGgoAAAANSUhEUgAAAMgAAABoCAYAAAC0RL9wAAAABHNCSVQICAgIfAhkiAAAAAlwSFlzAAALEgAACxIB0t1+/AAAABZ0RVh0Q3JlYXRpb24gVGltZQAxMC8wMS8xMHPQsdoAAAAfdEVYdFNvZnR3YXJlAE1hY3JvbWVkaWEgRmlyZXdvcmtzIDi1aNJ4AAAC/0lEQVR4nO3ZMWokRxiG4b+quntmJEuaaIVgAstgcGQFcwuDA7OZcbAH2BP4QovYSLvX0IAERqGxQSAkOxkNwt3V1V0b7G6oL7Or8b7PCb7kpaB+l3O2zWbjzeysrusfnXPfLhYL29vb23PONd57Q3nOOcs5l57xv5NztpRSH2PcdV0XU0q/xxjfr9fr38zMXM7Zrq6ufqmq6ofVanWwXC5LbwaKSCnZbrez+/v7v7quu0gpvXOXl5ffHx4evj49PT2pqqr0RqC4lJLd3Nw89X3/qw8hvDo+PiYO4JOqqmy1Wu3Xdf2zDyG8ODg4KL0JmJTlcml1XX/tF4tFds6V3gNMivfemqZp/Hw+3y89Bpii+Xy+76uqqksPAaYohND4GGPpHcBk+aZpSm8AJsl7b55LOfA86gAEAgEEAgEEAgEEAgEEAgEEAgEEAgEEAgEEAgEEAgGe4ZwjEOA5OWcCARQCAQQCAQQCAQQCAQQCAQQCAQQCAQQCAQQCAQQCAQQCAQQCAQQCAQQCAQQCAQQCAQQCAQQCAQQCAQQCAQQCAQQCAQQCAQQCAQQCAQQCAQQCAQQCAQQCAQQCAQQCAQQCAQQCAQQCAQQCAQQCAQQCAQQCAQQCAQQCAQQCAQQCAQQCAQQCAQQCAQQCAQQCAQQCAQQCAQQCAQQCAQQCAQQCAQQCAQQCAQQCAQQCAQQCAQQCAQQCAQQCAQQCAQQCAQQCAQQCAQQCAQQCAQQCAQQCAQQCAQQCAQQCAZ6Rczafcy69A5ikYRjMD8MQSw8Bpmgcx953XbcrPQSYorZtn3zbtmkcx9JbgEkZhsFSSv/4vu//eHx8LL0HmJTtdmsxxj993/dvb29vd7wiwEdd19nDw8Pffd+/cTlnu76+fllV1U8nJydHR0dHFkIovRH4z6WUbLvd2t3d3W4YhvOzs7ML9/mbd7PZfNM0zcsQwnez2ayezWZfee/rEII55wpPx5fIOWf/5hki52zDMNg4jn3btk8xxjiO403Xdefr9frWzOwDRljRpE0QZeIAAAAASUVORK5CYII=) no-repeat 0 0;} ");[/sourcecode]
Wow. Not so readable!
Fortunately most of that is a base64 version of the background image. I designed the background image as normal, using Fireworks (not that bloated Photoshop thing). I then converted it to a base64 image using an online converter.
I could have put this image on my server, or on one of the many services allowing image uploads, but I prefer it to be embedded in the actual Greasemonkey script. Usual arguments against base64 images don’t apply:
- The image can’t be cached: by definition the whole script including the base 64 image is permanently cached in the browser
- It takes (slightly) longer for the browser to process the image than just display a normal image: I’m never sure about this argument in the first place and it’s definitely not significant for a small image such as this.
One reason not to use it, is that anything using base64 is tarnished because of some hacking attacks using base64 code. Not base64 images and nothing to do with Greasemonkey, but some people are paranoid about base64 now.
So now we have the image code, where to we put it? Most often we’d add it as a background image to the element in question, for example:
[sourcecode language=”javascript”]$(‘div.lists-activity’).css(‘background-image’,’url(data:image/png;base64,iVBORw0KGgo….etc’);[/sourcecode]
We could do that here, but I’ve snipped that to shorten the full base64 image and we need to add it to two separate elements. The nicer solution is to create a new class and then just add that class to the elements that need the background image.
We can do that using the GM_addStyle function, which adds a style to the DOM (in this case thejohnonolan). We can then add that style to element in question, for example:
[sourcecode language=”javascript”]$(‘div.lists-activity’).addClass(‘thejohnonolan’);[/sourcecode]
Kicking The Script Off
Let’s leave the checkTwitterLoaded function aside for now (especially the name of function, which in hindsight could have been better). That’s where the main processing is done, but it won’t run by itself. It’s the last 3 lines that get things going:
[sourcecode language=”javascript”]$(document).ready(function() {
checkTwitterLoaded();
});[/sourcecode]
It’s pretty simple: it waits until the DOM is ready and then calls the aforementioned checkTwitterLoaded function.
The Main Function
So, at last, this is where the magic happens. The full code for the function is:
[sourcecode language=”javascript”]function checkTwitterLoaded() {
if ($(‘div.lists-activity’).length == 0) {
window.setTimeout(checkTwitterLoaded,200);
}
else {
$(‘hr.component-spacer:first’).show();
$(‘div.latest-tweet’).css(‘margin-top’,’1px’);
$(‘div.favorites-activity’).css(‘margin’,’6px 30px 2px 0′).addClass(‘thejohnonolan’);
$(‘div.latest-favorite-inner’).children(‘.tweet-text’).css(‘font-size’,’.9em’);
$(‘div.latest-favorite-inner’).css(‘width’,’172px’);
$(‘div.lists-activity’).css(‘margin’,’6px 0 2px 0′).addClass(‘thejohnonolan’);
}
}
[/sourcecode]
The first thing we do on lines 2 to 4, is to try to select the div with a class of lists-activity. If it doesn’t exist yet, we call this very same function again, using setTimeout with a period of 200 milliseconds. Fast forward 200 milliseconds and repeat, ad infinitum, until we finally get that div that we need.
Why? Because the div we are trying to select is not on the page by default. Instead, it is inserted by Twitter’s very own JavaScript. Race condition! We have to make sure that our script doesn’t run before Twitter’s one does, or there’s no div to manipulate and our script won’t work. Note, our script runs on several elements, but we only need to test the existence of the last one.
When we finally get the div, we know Twitter has inserted everything we need. We therefore take the other branch in the if statement, running line 5 to 12. None of this is rocket science, but here are a couple of notes:
- Line 6: The hr element is already on the page, but hidden. There’s no need to add it, we just need to show it. However, we need to use the :first because there are quite a few hr elements hidden and showing them all messes things up even more.
- Line 7: We just add a slight top margin to the latest tweets div to push it down to align with the input box you use to tweet.
- Lines 8 to 10: We tweak the margins for the Favourites area and add the background image, then change the font-size and width so that it fits nicely.
- Line 11: We tweak the margins for the Listed area and add the background image, but we don’t need to change the font-size and width like we did for Favourites.
And, that’s it…
Shortcuts
I created this this fairly quickly and there are quite a few things I could have done better.
In particular, the background image is a single image. It works for now, but isn’t scalable if Twitter changes the font size or adds more content to these boxes, meaning the text takes up more room. The image won’t scale with it.
Really it should use several images (or sprites of the same image), so that one image does the top round corners, another one does the bottom rounded corner and perhaps a third does the middle section.
But there you go. As I said this was done quickly.
Final Thoughts
The main reason I thought I’d post this was to highlight a few techniques that are useful during Greasemonkey scripting: embedding jQuery, base64 images, the GM_addStyle function and how to avoid race conditions.
Also, I want to increase awareness of how great Greasemonkey is and how easy it can be to write a script. Just roll up you’re sleeves and get going!